
The easiest way to create 3D photo (using Google Camera app)
If you own a smart phone with Android 4.4., you might have already tried the Lens Blur mode in Google Camera. This solution is very handy not only because you can blur the background on you photographs, but also because it allows to easily create a 3D photo without using special equipment such as stereo camera. In this article I will explain step-by-step how to do that.
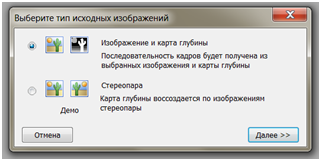
Fig.1
Step 1.
Take a picture in the Lens Blur mode. If you have already used the function, you surely remember that you shift your phone upwards but remain centered on your focal point when you take a picture. After that you can blur the background. Save the photo on your computer. It seems to be a conventional .jpg image, however, we can get a 3D photograph out of it.
Step 2.
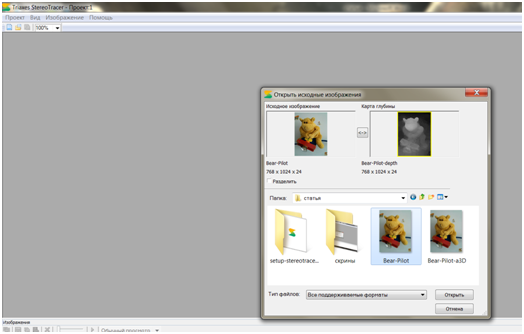
Fig.2
We need special software to create a 3D image. I use Triaxes StereoTracer . Run the software and create a new project (Project → New). Choose the first project type (Original picture and depth map) (fig.1.). Then the software will offer to choose a photo. Let’s open our new photograph. StereoTracer will get an image from the file and transform its additional data into a depth map.
Depth map – an image showing object distances from a view point in greyscale (light objects are closer, dark objects are further).
As you can see in the picture (fig.2), the program understands that apart from the photograph itself the file also contains data that StereoTracer transforms into the image depth map.
Step 3.
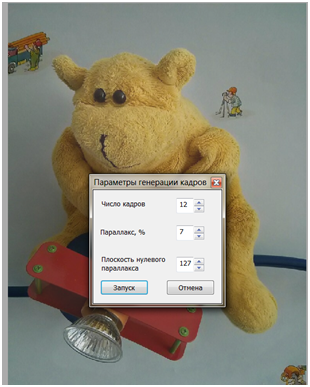
Fig.3
Now we generate a frame series (Image → Generate frames → Start). You can also press the relevant button in the bottom left corner. You will see the Frame generation options window where you can set the number of frames, parallax and plain of zero parallax (fig.3). The default parallax value in % is 7, the plain of zero parallax – 127. Let’s just press Start without changing anything to speed up the process. Later on you can play with settings and check the changing 3D effect on the resulting image. After pressing Start you will get a frame series that models the view of the object from different standpoints.
Now, if you go to the menu option View, you can see that the Animation mode is active now. Let’s select it. Or simply press the Toggle animation/Play button below. Now you can see how your animated 3D photo will look like. It is a good way to evaluate the 3D effect of the photo on the flat screen.
You can save the animated photo on your computer in the .gif format. Choose (Image → Generate frames → Start) and then select the .gif format. You can also set the image size and animation speed (frames per second) in the Save As dialogue window.
The resulting .gif file with the 3D animated photo can be sent to your friends or placed on your web-site or social network page.
And it’s not all! There’s another way to see a 3D on your computer with a conventional monitor. If you have anaglyph (red/cyan) glasses, you can also create an anaglyph photo using StereoTracer.
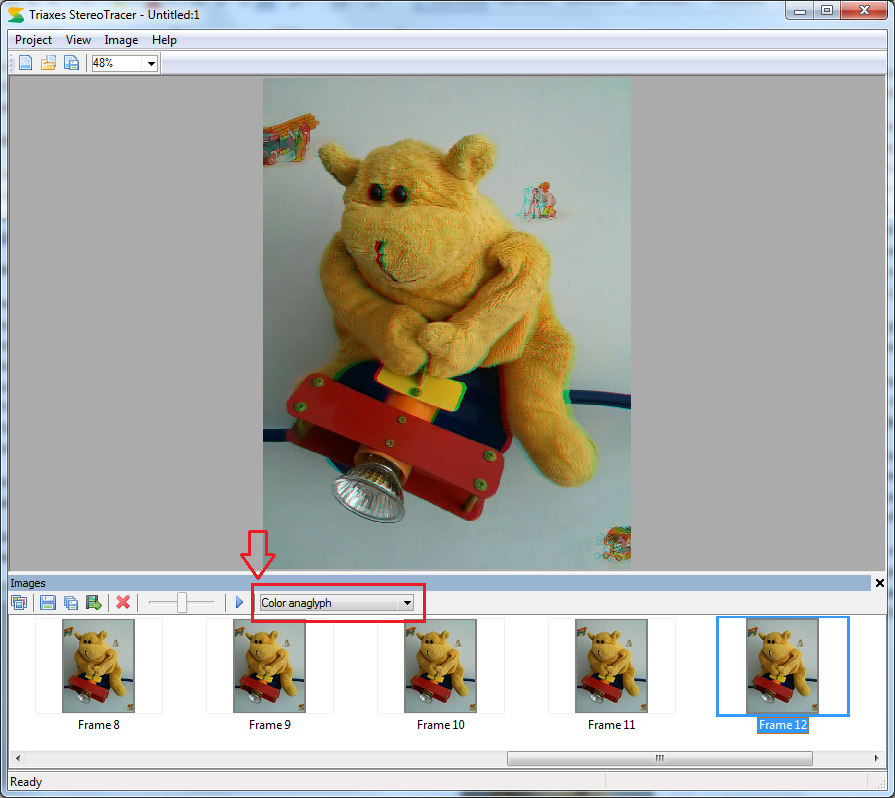
Fig.4
Click on any of the image from the generated series (at the bottom of the screen) and choose the view mode – Color anaglyph (if the image contains bright red, blue or green objects, you can try the Subcolor anaglyph or Grayscale anaglyph mode). By choosing different frames of the series you can control the intensity of the 3D effect.
You can save the anaglyph image on your computer. For that in the anaglyph view mode choose the menu item – Image → Save current view and choose the necessary format (.jpg, .bmp, .tif, .psd).
StereoTracer also allows to show and save a stereo pair in the side-by-side or cross eyed view mode (just choose the necessary mode).
The most exciting part is that you can make a 3D photo and watch it without glasses. However, you will need another program – Triaxes 3DMasterKit.
Final result
The process of 3D photo printing in brief:
A) frame series is exported from StereoTracer into 3DMasterKit;
B) 3DMasterKit encodes the image for the lenticular lens and prints it out;
C) printed image is put into a special frame with the lenticular layer or is applied to a special lenticular sheet.
You can use such a photo as usual (put it into a photo book or on the table, send to your friends, etc.), but it will be not a regular image but a 3D one.
I also recommend to watch this video. This tutorial can be of great help.


