3.1 Working with a project
The essence of Legend program is that it creates a stereo image from a set of frames for various viewing methods.
A combination of settings (links between files of source images, the method of image superimposing and their relative orientation, as well as the encoding parameters) is called "Legend project".
The Legend project can be saved to a file which can be opened later to continue working with. The extension of Legend project files is .mtp.
Note, that only program settings and links between source images are saved in the Legend project. The source images themselves are neither saved nor modified in any way. Paths to files with source images are saved according to the location of the project file. That is why when you move (or copy) a project file to a new location on the disk, you should also move its source images.
It is convenient to store source images and project files together in the same directory (folder).
Creating a new project
Menu command: Project >> New Project
Hot keys: Ctrl+N
Toolbar button: 
Saving a project
Menu command: Project >> Save Project
Hot keys: Ctrl+S
Toolbar button: 
Opening a project
Menu command: Project >> Open Project
Hot keys: Ctrl+O
Toolbar button: 
Opens the project saved previously.
Adding frames into a project
Menu command: Project >> Add frames
Hot keys: Alt+Shift+O
Toolbar button: 
The Add frames command opens the Open Source Images dialog. This dialog allows you to select one or several image files that should be added to the project. The left part of the dialog box contains the group of control elements from the standard Windows Open file dialog. The right part of the dialog box contains the list of selected files. To choose a file, select its name on the left list and click the arrow button  . Holding down the Shift (or Ctrl) key, you can select several files at once.
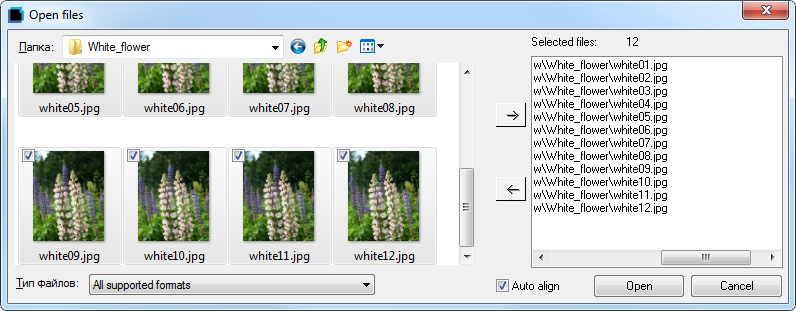
Fig. 3.1. Open source images dialog
To delete a file or several files from the right list, select it/them with the mouse and click the arrow button  . A double left-click also removes file names from the list.
To load the selected files to the project and add them to the frame sequence, click Open. If you checked the Auto-align option, the images will be aligned relative to the first image of the existing frame sequence, or relative to the first image being loaded.
The auto-alignment process can take a lot of time. The Auto-alignment progress dialog will show how the process is advancing. You can interrupt the process of adding frames by clicking Cancel in the Auto-alignment progress dialog.
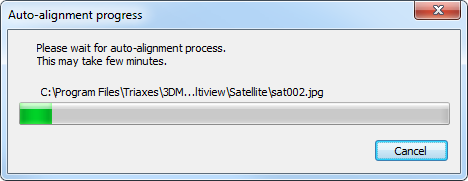
Fig. 3.2. Auto-alignment progress dialog
The program supports frames in the RGB and CMYK color model. In this case, all added frames should be in the same color model, using both RGB and CMYK frames in the same project is not allowed.
Formats supported for opening:
Format |
Description |
bmp |
A file format for bitmap image storing without data compression and losses in their quality. |
tiff |
A file format for bitmap image storing with some compression but without losses in their quality. A .tiff file is in average two times smaller than a .bmp file. |
jpg |
A file format for bitmap image storing with some compression and some losses in their quality. The file size is on the average 40 times smaller than a .bmp file. Quality loss can be expressed in slight color corruption and appearing artifacts peculiar to the .jpg compression. The quality level approximately corresponds to 7-8 (Medium-High). It is not recommended to save lenticular encoded images in this format. |
jps |
The same as .jpg. The letter "s" at the end means that the file contains a stereo pair of images for the cross-eyed viewing. Special software for viewing stereo pairs recognizes the files of this type. |
png |
A wide-spread storing format for bitmap graphic information using some compression without losses in quality. |
gif |
A storing file format for graphic images with the indexed color palette. |
psd |
A storing format for bitmap graphic information using some compression without losses in quality which was created especially for Adobe Photoshop software. |
3dm |
A special file format which was created to store multilayer templates of the Legend and 3DMasterKit software. |
mpo |
A file format for bitmap image storing, used in the Fuji FinePix REAL 3D W1 3D camera. It contains 2 images in the .jpg format with special technical information. |
Tab. 3.1. Formats supported for opening
Adding layers to the project
Menu command: Layers >> Add
Hot keys: Ctrl+Shift+O
Toolbar button: ![]()
The Add command opens the Open Layers dialog. You can find a more detailed description of this dialog in the previous section.
Formats supported for opening are given in the previous section (Adding frames to a project). Also the RGB and CMYK color models for the layers are supported, provided you use one color model for all layers.
Deleting the current image from the project
Menu command for frames: Edit >> Delete
Hot keys: Del
To delete an image (either a source frame or a layer) from the project, click on it and press Delete or execute the corresponding menu command. Besides, you can delete the current layer using a special button  on the Layers window that is used (see section 2.5).
Using Shift and Ctrl you can select and delete the set of images from the project.
Saving images
Saving the generated image
Saving the generated images out of the Stereoscope, Anaglyph, Direct view and Interlace tabs.
You can save the generated image to a PC.
Menu command: Project >> Save Generated Image
Hot keys: Ctrl+Shift+S
Toolbar button: 
You can save images in the following formats:
Format |
Description |
bmp |
Saving images without data compression. Images are saved without losses in their quality. |
tiff |
Image data are compressed without losses in quality. Images are saved to a file that is in average two times smaller than a .bmp file. |
jpg |
Image data are compressed with some losses in quality. The file size is on the average 40 times smaller than a .bmp file. Quality loss can be expressed in slight color corruption and appearing artifacts peculiar to the .jpg compression. The quality level approximately corresponds to 7-8 (Medium-High). It is not recommended to save lenticular encoded images in this format. |
jps |
The same as .jpg. The letter "s" at the end means that the file contains a stereo pair of images for the cross-eyed viewing. Special programs for viewing stereo pairs recognize files of this type. Available in the Direct view tab. |
Tab. 3.2. Formats supported for saving source frames
If you choose the To file encoding option in the Lenticular tab, the following image-saving options will be available in the Save dialog.
Images with the size of up to 2 Gb:
Format |
Description |
psd |
Adobe Photoshop format. RGB and CMYK support, transparency (alpha channel) support. |
bmp |
Windows bitmap format, RGB color model. |
Images larger than 2 Gb:
Format |
Description |
psb |
Similar to the .psd format, supports image sizes of more than 30 000 pixels*, RGB and CMYK support, transparency (alpha channel) support. |
tif |
BigTIFF** format, RGB and CMYK support, transparency (alpha channel) support. |
File formats .psb and .tif are available in 3DMasterKit Photo A3+, Photo 120 and Professional only.
Note*: psb files with the image height of more than 30 000 pixels have a compatibility problem with Adobe Photoshop. In this case it is recommended that you use the BigTIFF format (.tif).
Note**: the BigTIFF format is a modified TIFF format, therefore graphic editors do not recognize the resolution saved to a file (DPI). When you open the image in a graphic editor, set the correct resolution manually and disable the resampling option (image interpolation).
You can use Legend to print the image saved to a file. Add the image to the empty project (Project >> Add frames), and switch to the Print mode (Project >> Print preview). For more details see section 3.6 Printing images.
Saving frames
For saving frames out of the Frames tab (generated series of multilayer frames or aligned and cropped sequence of source frames), use the Project >> Export Frames menu command. When exporting, only the area of images that is inside the crop rectangle is saved .
The Image export dialog is shown in Fig. 3.3. On the drop-down list in the bottom you can choose the type of the file to be created (.bmp, .jpg, .tiff, .psd – to create a series of pictures; .gif, .avi, .mp4 — to create an animation file).
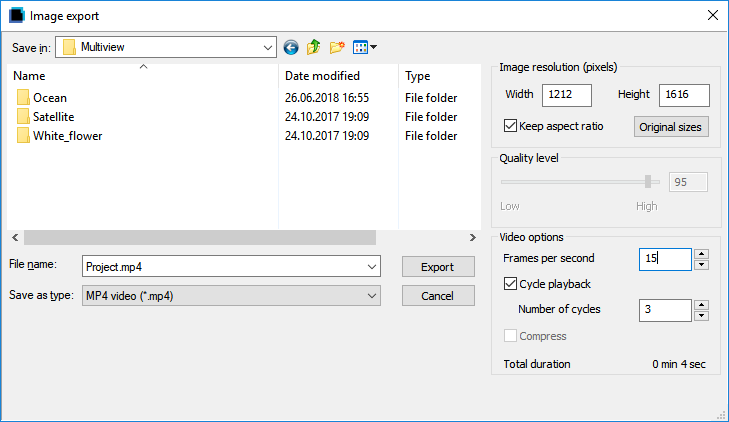
Fig. 3.3. Image export dialog
Supported file formats:
Format |
Description |
bmp |
Saving images without data compression. Images are saved without losses in their quality. CMYK color model is not supported. |
tiff |
Saving images with insignificant compression. Images are saved almost without quality loss. |
jpg |
Image data are compressed with some losses in quality. The file is on the average 40 times smaller than a .bmp file. It is possible to set image quality value. |
psd |
Saving images in the Adobe Photoshop format. |
avi |
Series of frames are saved into a video. Derived file has a better quality than the GIF animation, compression is supported. |
gif |
Frames are saved into a video. Derived file is convenient to allocate on web sites. |
mp4 |
Series of frames are saved into a video. It is possible to set number of playback cycles. |
Tab. 3.3. Formats supported for saving frames out of the Frames tab
In the Image resolution (pixels) box you can change the size of the image (in pixels). The Keep aspect ratio checkbox means that, when Width or Height is changed, the resolution is automatically re-calculated to save original ratios of the width to the height. The Original sizes button allows you to restore original sizes of images.
For jpg files you can set the image Quality level (default: 95), which is converted to the appropriate compression ratio.
In the Video options box you can specify parameters of the created video (active only for gif, avi and mp4 file types): frames per second (playback speed), cycle playback, number of cycles, compression.
The Frames per second (fps) option specifies how quickly frames will be replaced during playback, also it affects the total duration of the animation and video.
If the Cycle playback box is checked, the video that can be conveniently reproduced for several times is created. Such a video contains frames from the first to last one and back to the first one. If the Cycle playback box is not checked – the video with frames only from the first to last one is created (with a smaller file size). For mp4 files it is possible to set the Number of cycles for frames playback, which increases the duration of the video file.
When the Compress box is checked (active only for the .avi file type), compression by the standard video-codec takes place. Such a file occupies much less disc space.
Below the estimated total duration of the animation/video is displayed.