4.10 Use of the histogram dialog for the depth map correction
You can create or correct a depth map using the Histogram dialog. Click the right mouse button on the original image or the depth map and choose Create depth map… or Correction… menu commands in the context menu – Histogram dialog will appear (Fig. 4.9).
If you choose Create depth map… menu command – the current depth map will be replaced by a new one, created based on the original image.
If you choose Correction… menu command – the current depth map will be edited by a histogram and filters of the dialog.
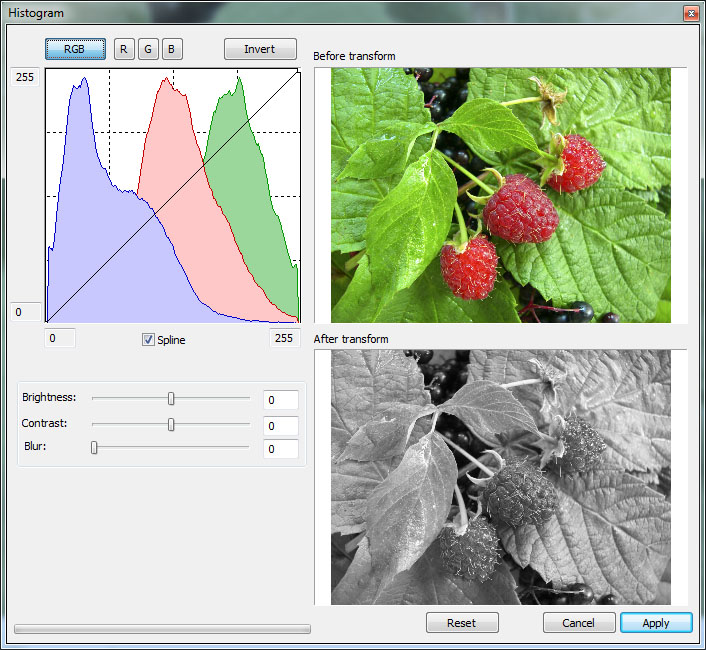
Figure 4.9. Correcting the depth map by the Histogram
Histogram (in the photography) is a graph of the semi-tones allocation that has two axes: the x axis represents the brightness, and the y axis represents the relative number of pixels with corresponding brightness values.
By the histogram you can find out the main idea of exposition correctness, image contrast and color depth, define the required correction when you take a photo (changing exposition and color balance, light or image composition) and also when processing is started.
Use the buttons above the histogram to correct it by separate color channels: RGB – all channels, R – red channel, G – green channel, B – blue channel. By clicking Reset button you can go back to the source histogram.
Set the control point by clicking the left mouse button clicking. Remove the control point by clicking the right- mouse button clicking. Move the control point by left-mouse clicking on the graph and holding the point while you're moving it to the necessary place.
There are two ways to connect the controlling points: the spline and the broken line. Use Spline flag under the histogram to enable/disable the spline mode. Fields by the x and the y axes allow correcting manually the brightness of borders. Besides, they can be moved by clicking the left-mouse button clicking on the required border.
Below the histogram there are Brightness and Contrast sliders to set brightness and image contrast.
You can also apply the Blur filter to the image, regulating the extent of blur by Radius slider (the value of the radius is specified in pixels). This feature is used to tone down sharp details when generating a sequence of frames – for better result of the generating a sequence of frames, it is necessary the transition between the objects in the depth map must be more smooth. The Blur filter allows to avoid artifacts (imperfections) at the edges of the objects. So, if such defects as the vertical curved line are appeared in the generated images, use that feature.
In the depth map image, the more remote an object, the darker it should be. In case, the foreground objects of the original image are darker than the objects of the background, the feature Invert is used. The operation of Inversion will invert the depth map image so that the closer object will be lighter, than the remote ones. Press the Invert button to apply that operation.