Description
When specifying the lens pitch, manufacturers use rounded-off numbers, for example, 60 lpi. The lens pitch can be slightly different in different batches. This technological peculiarity is common for all lenticular lens manufacturers. The encoding pitch must coincide with the lens pitch. To find the precise value of the lens lineature you should perform the pitch test. It is highly recommended to perform the pitch test when working with new batches of lenticular material, paper, or when changing the printer.
- Switch to the Lenticular tab and press Pitch Test.
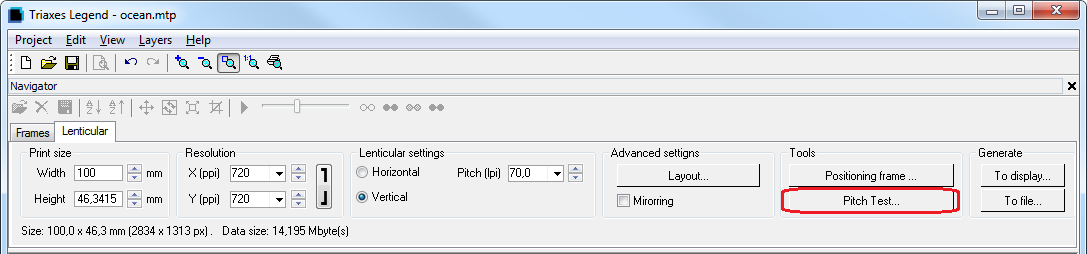
The following dialog will appear. In this dialog you need to set parameters of test print page:
- Input lpi value in the Pitch field. For example, if you work with 70 lpi lenticular – then enter "70".
- In the field Test step input the lpi value of the pitch-test's lines period. If the pitch value is 70 lpi and the test step is 0,1 lpi, then series of values will be:
… 69,7 69,8 69,9 70 70,1 70,2 70,3 …
After the correct value is found, when color switching is more distinct and sharp, you can make one more specifying pitch-test with the test step 0,01. For example, the best color switching was with the value 70,2, then in the Step field of the new pitch-test dialog enter "70,2" and in the Test step field enter "0,01". The series of values will be:
... 70,17 70,18 70,19 70,20 70,21 70,22 70,23 ...
- Input the resolution value. To discover the resolution of your printer, press Change printer, at the lower part of the dialog and choose the necessary printer. After that, the resolution of the printer will be displayed in the Print Settings field. Then, just input this value in the Resolution field.
- If the Frame option is selected, then a 1 pixel-thin black border will be drawn around the pitch-test, which allows to precisely combine it with the lenticular.
- Press Generate.
All the rest values are set by default, it is not necessary to change them.
- After that, select Project >> Print preview or press Ctrl+P.
The print preview window will appear. - Press Print Setup and set the highest print quality in the dialog that will appear.
- Press Print.
Note: Use the same paper for the pitch test and for the actual lenticular pictures.
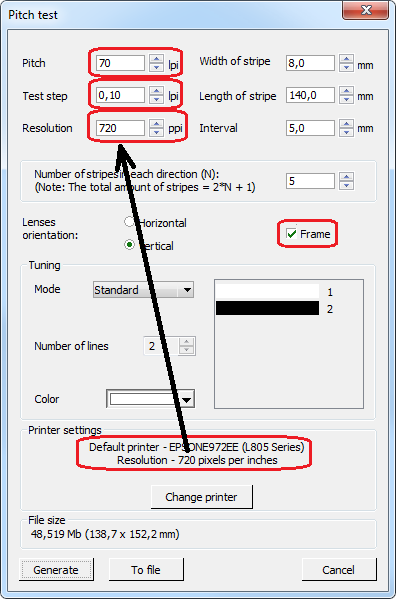
The following should come out:
You can see a thin line on top perpendicular to the pitch bands. Apply the lens to the paper, so that the line does not look broken, and it is still an entire line.
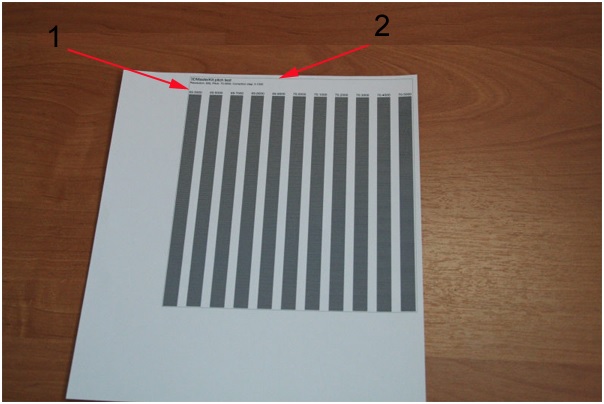
Then, changing your viewing angle, try to find the band on the pitch test which has all stripes changing their color simultaneously. This means there are no waves on the band.
In the picture below it is the fourth band from the right side. You can see that it is evenly colored in the light-gray, while the other bands are not. They have some waves throughout the length.
Changing your viewing angle, you can see that the stripe is switching its color very evenly. In the picture below the whole line is black-colored and has no waves.
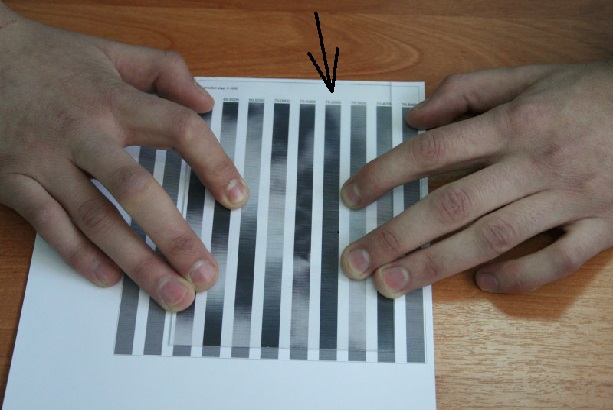
This means we should take the value specified above this very band and use it when encoding the picture for these plastic and paper. For example, we got the value of 75,55. We input this value in the Pitch field (lpi) in the Lenticular tab before generating.
